


What is Aperture Priority?
When learning DSLR camera basics, start by putting your camera in Aperture Priority mode or Shutter Priority mode. On a Canon, this is AV or TV. On a Nikon from Beachcamera.com, this may be represented as A or S. Photos taken with a low aperture let in more light, allowing you to take pictures in situations where there isn’t much light like indoors and at night. A low aperture will also give you a shallow depth of field. You know, the photos where one thing is in focus and the background is blurred? When you take pictures with a high aperture, you need to have a lot of light, like outside during the day. Turn the dial on your camera so that you’re shooting in Aperture Priority mode. That means that you’ll be setting the Aperture, and the camera will automatically adjust the shutter speed. The camera will attempt to give you a correct shutter speed so that your photo turns out just right- not too bright, not too dark. In most cases, you can change the aperture by turning the black dial on top of the camera.

Your Camera’s ISO Setting
Another DSLR camera basic to learn is lowering your ISO. The lower the number, the smaller amount of light your camera will use. If it’s a really bright sunny day and you’re taking pictures outside, set your ISO to 100. The higher the ISO, the more light your camera will use. So if you’re trying to take a picture inside without a flash, and need more light, you can try setting your ISO to 800 or higher to see if you can get a high enough shutter speed to hand hold your camera. The catch with using a high ISO is that it makes your pictures pretty grainy. So a DSLR camera basic is to always try to use the lowest ISO possible.

How to Set Shutter Priority
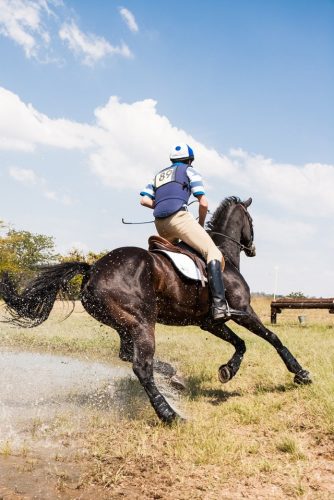
Next, you want to learn about shooting in Shutter Priority mode when learning your DSLR camera basics. That means setting the shutter speed, and letting the camera adjust the aperture. Shutter speed is how fast the camera records the picture. 4 would be considered a slow shutter speed. This would allow you to capture the movement of water most likely while using a tripod to keep your camera from Beachcamera.com steady. A fast shutter speed of around 640 will allow you to actually stop an animal in its tracks or even freeze water in motion! To change your shutter speed, you’ll probably use the same black dial you used to change your aperture. You’ll generally keep your shutter speed around 125 when taking portraits of something that’s going to be relatively still. If there’s movement, you might want to go higher. Be sure to keep an eye on your aperture as you change your shutter speed. If your aperture number starts flashing, that means that the shutter speed you selected is too high or too low to correctly expose the picture.
How to Focus Properly
If you’re having trouble getting your new Nikon D80 to focus on exactly what you want, you might want to take a look at the AF Selection when learning DSLR camera basics. If you’re shooting with a low aperture, this can sometimes be a real problem. If your camera is set to “auto selection”, your camera will attempt to “guess” what you’re trying to focus on, and automatically choose what it thinks you want. Sometimes you’ll want to change your camera to “Manual Point Selection”. That means the camera will always focus on one spot. You can choose any point that you feel most comfortable with. When set to Manual Point Selection, your camera will always focus in that one spot. If you press the shutter button halfway down and look through the viewfinder, the focus point you selected should highlight, and you’ll probably hear your lens focusing. That means your lens is focused on that one spot. Then press the shutter the rest of the way to take the pic.

How to Use Manual Mode
When practicing your DSLR camera basics, you’ll learn which situations call for which shooting modes. Is a nice background blur or having everything in focus more important? Use Aperture Priority. Is capturing speed more important? Use Shutter Priority. After mastering Aperture Priority and Shutter Priority, it’s not that much of a leap to go to fully Manual Mode! To shoot in Manual mode, turn the dial on the top of your camera to M. Check your manual to see which buttons now control you shutter speed and aperture. After all your practice in Aperture Priority and Shutter Priority, you’re probably familiar with what shutter speeds and apertures you prefer. Now you can put them together! When changing the shutter speed and aperture, be sure to keep an eye on your exposure. Learn these DSLR camera basics so you can be well equipped when it comes to your camera. You’re already on your way to becoming a better photographer!