


Panning Photography
Panning photography is a technique performed through capturing an object in motion while moving the camera parallel to the object. By moving the camera together with the object, the object remains sharp and the background becomes blurred. The background blur is a result of the motion and is in the opposite direction of the object motion. With panning photography, even if there are other objects in the same distance from camera, they’ll be blurred due to the speed and direction differences. Set the camera to shutter priority mode while setting the shutter speed to be slow enough to capture the motion but not too slow that the entire image will be blurred, considering both the object speed and the selected focal length. Once the camera from Beachcamera.com is set, the next step is to track the moving object. During the exposure the viewfinder is usually unusable. It’s recommended to start following the object ahead of pressing the shutter button in order to gain the feeling of motion for the sharpest result when trying panning photography.

Light Painting
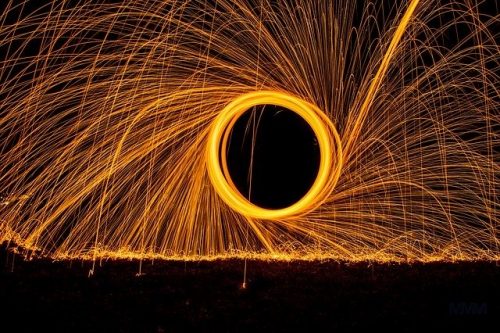
To give light painting photography a whirl, you’ll need two things: a tripod, because this will be a long exposure, and a light source you can control, such as a flashlight, candle, glow stick, etc. Find a dark place and put the camera on a tripod. Stop down the aperture to f/8 or smaller and then set the exposure to either bulb mode if you’re using a remote shutter release, or to a longer exposure of 15-30 seconds, depending on what you’re shooting and how you’re painting it. Then hit the shutter, and paint! You can do this a couple of ways. The first is to aim the light back at the camera, and the other is to shine it on whatever it is you want to paint. Light painting photography will take lots of practice and patience, but the result can be fun.
Rembrandt Lighting
Rembrandt lighting is a well-known portrait photography technique lighting setup. To achieve this ‘look’ one half of the model’s face will be in full illumination while the other half, usually the side furthest away from the camera is in partial shadow, with a very distinct illuminated triangle under the eye on the shadowed side. To create Rembrandt lighting the subject must turn slightly away from the light. The light must be above the top of the model’s head so that the shadow from their nose falls down towards the cheek. Not every person’s face is ideal for creating Rembrandt lighting. If they have high or prominent cheek bones it will probably work. If they have a small nose or flat bridge of the nose, it may be a difficult portrait photography technique to achieve.
Double Exposure
Double exposure photography is a technique that layers two different exposures on a single image, combining two photographs into one. Double exposure creates a surreal feeling for your photos and the two photographs can work together to convey deep meaning or symbolism. Both Canon and Nikon make digital cameras with in-camera double exposure settings that will help you create the effect. The double exposure setting allows you to select a base image from the memory card from Beachcamera.com and take a second exposure on top of that image. The camera layers the images and adjusts exposure for you. Double exposure photos are impressive on their own, but you can up the “wow” factor even more. Blend two photos of the same subject to make a creative statement about seeing a person or an object in two different ways. Take the photos in black and white to blend the two images more seamlessly making it harder to tell where one ends and the other begins. You can even blend two double exposures. It will take some refining, but the results are doubly as stunning.
By learning and practicing these techniques, you can take your skills up a notch and begin to develop your own style.